This is the beginning in a series of posts which I hope will culminate in a complete Web Application with a JS Frontend, Java Backend and Database.
So building a backend, not just any backend but a Java Restful Web Service backend and a little bit of Dependency Injection thrown in.
The technologies:
- Google Guice
- Jersey
- Maven
- Tomcat
Getting Started
Like starting any project you want to be up and running as quickly as possible. So using a maven archetype quickly generates the file structure and pom.xml. For this project a basic quick start archetype will work nicely.
mvn archetype:generate -DarchetypeGroupId=org.apache.maven.archetypes -DarchetypeArtifactId=maven-archetype-quickstart
Running the above on the terminal will kick off maven to download everything it needs and start creating the project structure, it'll also ask you a few questions like what your project name and group id is.
When maven completes you'll be left with a project folder containing your new java project. The project wont have a lot in it but what it does have is:
- src/main/java - where all the application code goes.
- src/test/java - where all the test code goes.
- pom.xml - dependency and build configuration file.
It's basic maven, so I wont go into any detail but the maven site has some great documentation.
Extra Dependenices
To start writing some code you first need to get some extra libraries for Guice, Jersey and Javax Servlet. All the libraries are added to the pom.xml in between the dependencies tag.
<properties>
    <project.build.sourceEncoding>UTF-8</project.build.sourceEncoding>
    <project.jersey.version>1.18.3</project.jersey.version>
</properties>
<dependencies>
    <dependency>
        <groupId>com.google.inject.extensions</groupId>
        <artifactId>guice-servlet</artifactId>
        <version>4.0-beta</version>
    </dependency>

    <dependency>
      <groupId>javax.servlet</groupId>
      <artifactId>servlet-api</artifactId>
      <version>2.5</version>
      <scope>provided</scope>
    </dependency>

    <dependency>
      <groupId>javax.ws.rs</groupId>
      <artifactId>jsr311-api</artifactId>
      <version>1.1.1</version>
    </dependency>

    <dependency>
      <groupId>com.sun.jersey</groupId>
      <artifactId>jersey-servlet</artifactId>
      <version>${project.jersey.version}</version>
    </dependency>

    <dependency>
      <groupId>com.sun.jersey</groupId>
      <artifactId>jersey-json</artifactId>
      <version>${project.jersey.version}</version>
    </dependency>

    <dependency>
      <groupId>com.sun.jersey.contribs</groupId>
      <artifactId>jersey-guice</artifactId>
      <version>${project.jersey.version}</version>
    </dependency>

    <dependency>
      <groupId>com.sun.jersey.contribs</groupId>
      <artifactId>jersey-multipart</artifactId>
      <version>${project.jersey.version}</version>
    </dependency>
</dependencies>
So what are all these libraries for?
Google Guice - Allows us to build the application code using the dependency injection software pattern and Guice specifically has a few handy features.
Javax Servlet - Standard Java library for building Java classes, named Servlets, to handle http requests.
Jersey - A framework for building Restful webservices.
Lets Code Something
We need something to be the main starting point for the app, I've called it AppServlet. But really you can call it whatever you want just make it meaningful, java isn't called a verbose language for nothing!
AppServlet
Create AppServlet in the root package e.g. com.davidrobson. This first class sets up Guice and defines which Java objects should be included in Guice's dependency injection (DI) world of happiness.
package com.davidrobson;

import com.google.inject.Guice;
import com.google.inject.Injector;
import com.google.inject.servlet.GuiceServletContextListener;

public class AppServlet extends GuiceServletContextListener {
    @Override
    protected Injector getInjector() {
        return Guice.createInjector(new RestModule());
    }
}
By extending GuiceServletContextListener and overriding the getInjector method you can add an object to the DI container. From the example you can see RestModule being passed as an argument to the Guice.createInjector() method. This now makes it available via DI. Pretty easy right!? To add mulitple objects simply pass them comma sperated into the same Guice.createInjector() method.
One thing is that the objects being past to Guice.createInjector() must extend Guice's ServletModule object.
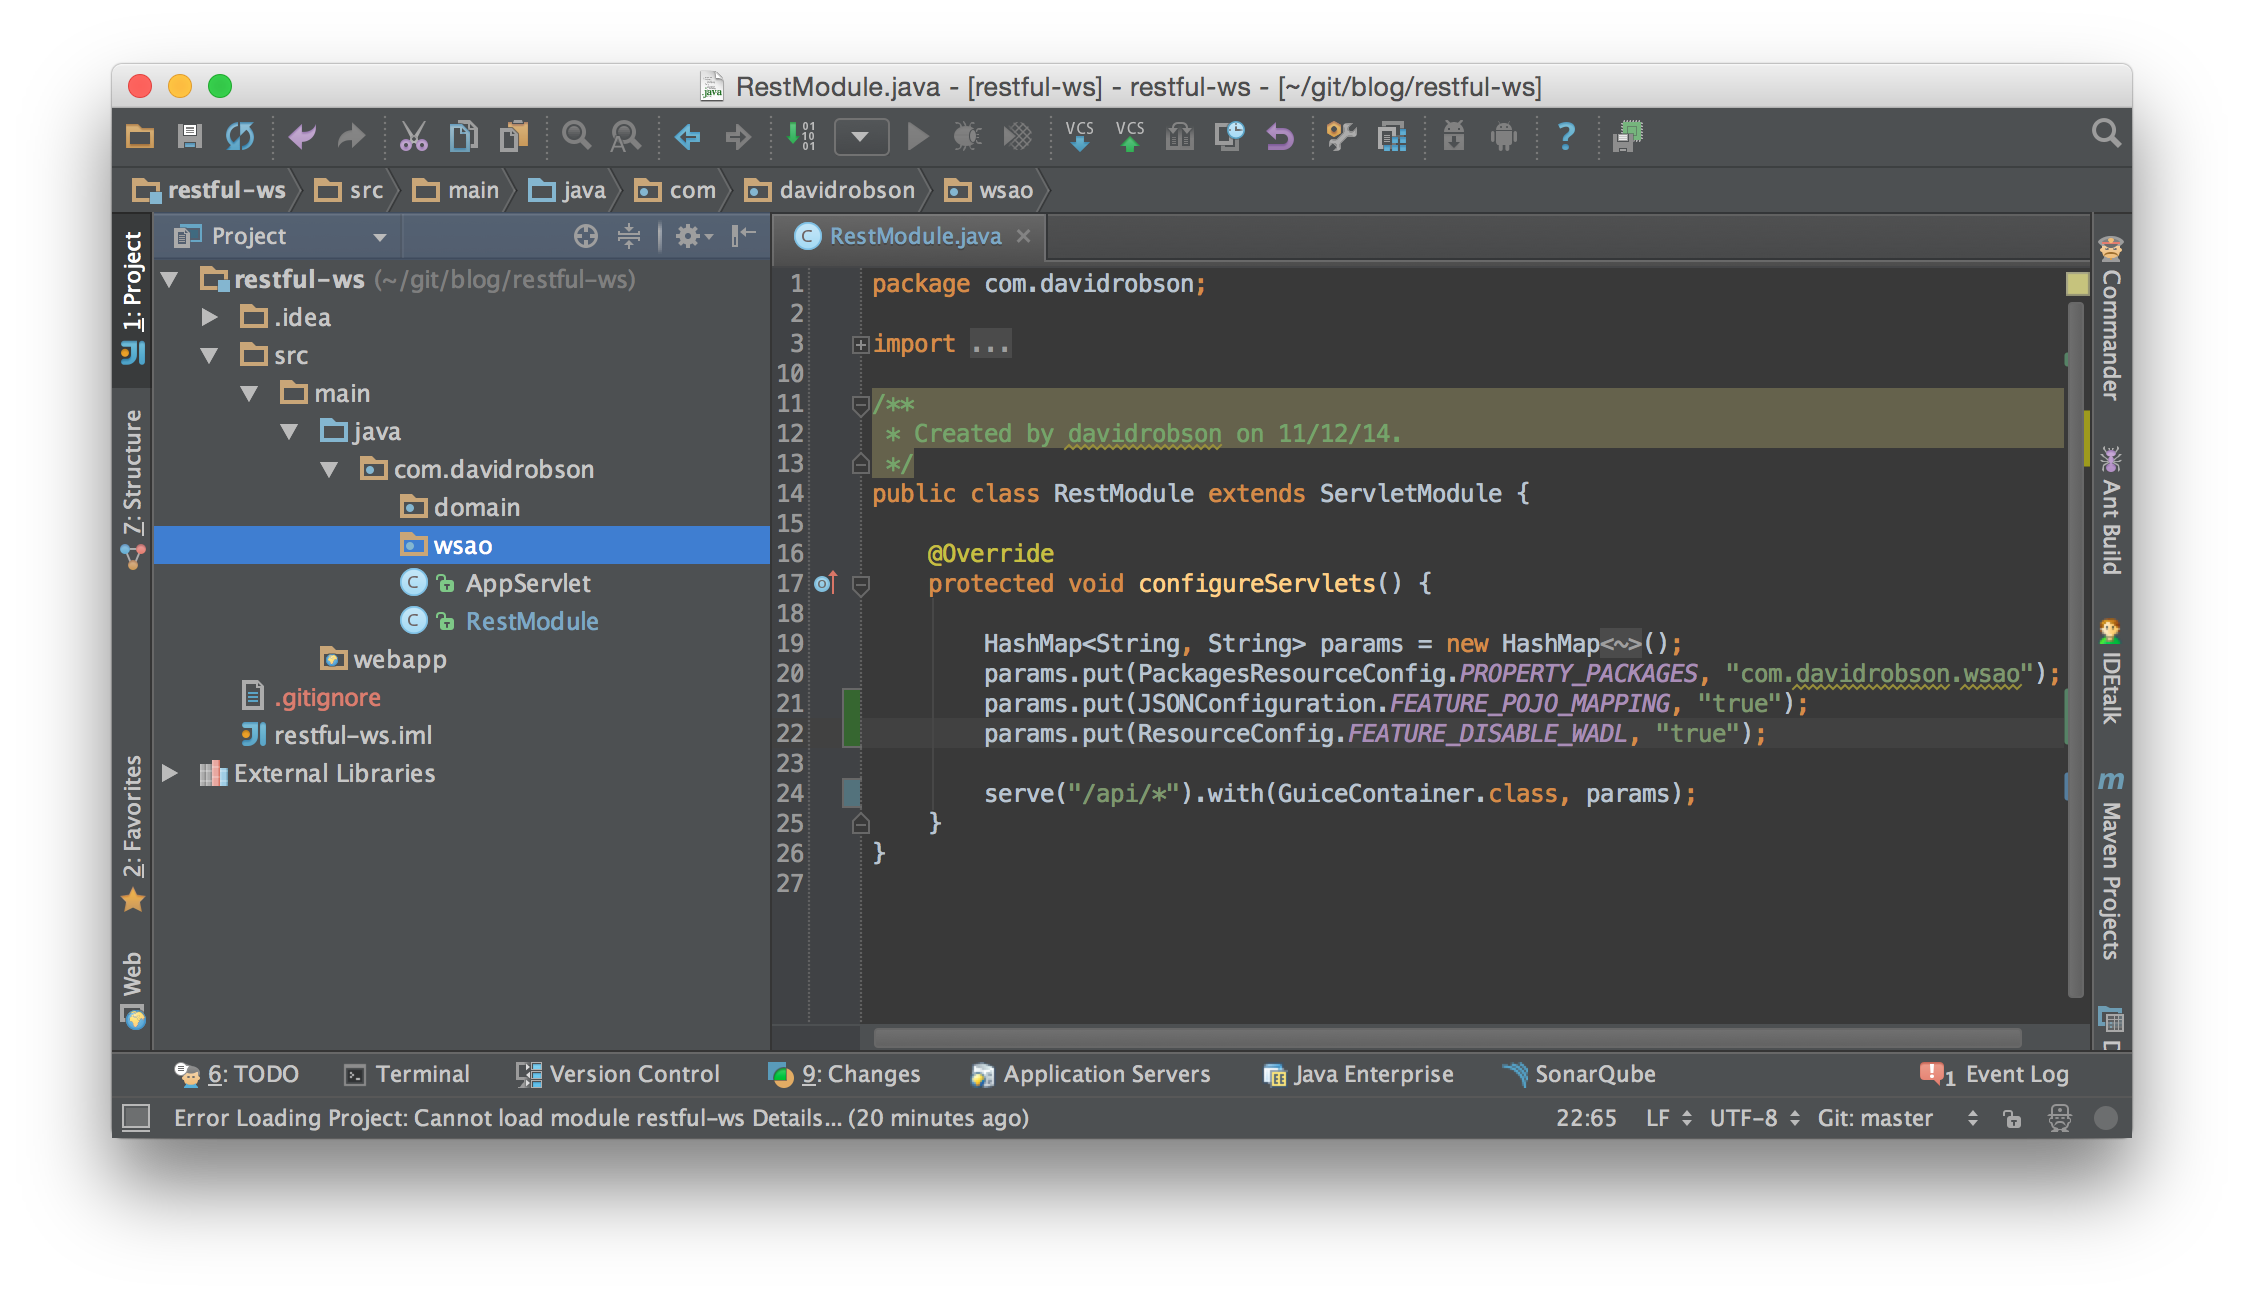
RestModule
But wait your probably thinking where did RestModule come from!? and what is it? RestModule, in the root package, is a class that contains configuration needed for the application's restful endpoints.
package com.davidrobson;

import com.google.inject.servlet.ServletModule;
import com.sun.jersey.api.core.PackagesResourceConfig;
import com.sun.jersey.guice.spi.container.servlet.GuiceContainer;

import java.util.HashMap;

public class RestModule extends ServletModule {

    @Override
    protected void configureServlets() {

        HashMap<String, String> params = new HashMap<String, String>();
        params.put(PackagesResourceConfig.PROPERTY_PACKAGES, "com.davidrobson.wsao");
        params.put(JSONConfiguration.FEATURE_POJO_MAPPING, "true");
        params.put(ResourceConfig.FEATURE_DISABLE_WADL, "true");

        serve("/api/*").with(GuiceContainer.class, params);
    }
}
Theres a few cool parts to RestModule. The first is the params were adding to the HashMap. It's the first bit of Jersey code. What its doing is configuring a property (PackagesResourceConfig.PROPERTY_PACKAGES) which defines all the packages of the project we want scan for objects to add to DI, in this case its the com.davidrobson.wsao package. So com.davidrobson.wsao is a package we haven't created yet but it'll contain all the restful endpoints and I'll explain about it in more detail later. The other bit of param configuration to take note of is JSONConfiguration.FEATURE_POJO_MAPPING, it allows the restful endpoints to automatically convert json to pojo and vice versa.
The other cool thing is Guice's serve() method. serve("/api/*") defines the url on which we want to respond to http requests. While with(GuiceContainer.class, params) defines what classes will respond. Putting it altogether RestModule is saying we want to respond to any requests on the /api url with the classes in com.davidrobson.wsao.
By setting up the endpoints in this way they are also available via DI.
Structuring
In the previous examples you can see how simple it is to add objects to DI and to do http routing. Now its time to think a tiny bit about structuring of the code. For purpose of this post I could throw the code in all over the place and be done with it, but this is a project I want to build on top of. So stucturing it nicely is important.
Adding two new packages will help keep everything tidy, domain and wsao. The domain package is good for containing pojos representing anything that could used in multiple areas of the code but only holds a small amount of data. Like a User object. The wsao, Web Service Access Object, package is where all the classes defining the restful endpoints are stored.
As an application grows it can be very easy to forgot about structuring the code and it quickly turns to spaghetti. By doing a little now it can help a lot in the future but thats just my opinion. If you have structure or pattern you follow and is successful run with it.
User
Just a very simple pojo that will hold our user data.
package com.davidrobson.domain;

public class User {

    private String firstname;
    private String lastname;
    private String email;

    public User(String firstname, String lastname, String email) {
        this.firstname = firstname;
        this.lastname = lastname;
        this.email = email;
    }

    //Getters and Setters
}
UserWsao
package com.davidrobson.wsao;

import com.davidrobson.domain.User;

public interface UserWsao {
    public User getUser();
}
Just a very simple interface, in the com.davidrobson.wsao package, providing structure for the UserWsaoImpl class.
UserWsaoImpl
The first class inside of com.davidrobson.wsao.
package com.davidrobson.wsao;

import javax.ws.rs.GET;
import javax.ws.rs.Path;
import javax.ws.rs.Produces;

@Path("/user")
public class UserWsaoImpl implements UserWsao {
    @GET
    @Produces(MediaType.APPLICATION_JSON)
    @Override
    public User getUser() {
        return new User("David", "Robson", "david@davidrobson.co.uk");
    }
}
So a few new bits are being introduced here. First of all I lied about all the classes in the wsao package automatically being added to DI. I know shock horror, earth shattering, world crumbling!! When Jersey scans the package its actually checking for classes with the @Path annotaton. Why I hear you shout, well why add everything when we only want endpoints!? In this case the @Path annotation serves a double purpose. It identifies its self to be added to DI and defines the url on which the class responds to.
Web.xml
The next step is to create the web.xml, which defines what handles the http requests received by the application.
First create a webapp/WEB-INF folder which needs to be created in src/main. The web.xml is then placed in WEB-INF.
<?xml version="1.0" encoding="UTF-8"?>
<web-app version="2.5" xmlns="http://java.sun.com/xml/ns/javaee" xmlns:xsi="http://www.w3.org/2001/XMLSchema-instance" xsi:schemaLocation="http://java.sun.com/xml/ns/javaee http://java.sun.com/xml/ns/javaee/web-app_2_5.xsd">

    <filter>
        <filter-name>guiceFilter</filter-name>
        <filter-class>com.google.inject.servlet.GuiceFilter</filter-class>
    </filter>

    <filter-mapping>
        <filter-name>guiceFilter</filter-name>
        <url-pattern>/*</url-pattern>
    </filter-mapping>

    <listener>
        <listener-class>com.davidrobson.AppServlet</listener-class>
    </listener>
</web-app>
Our web.xml contains two main elements. First a mapping to direct all http requests through the GuiceFilter, enabling DI. Second defining an event listener. A class listening for two specific Servlet events (initialization and destruction), basically the application starting and stopping. For us thats the AppServlet.
Running The App
Everything is now in place to run and test the app. First the code needs to be compiled and a WAR file generated. This is done by running a few maven goals, clean and verify, on the terminal in the root of the project.
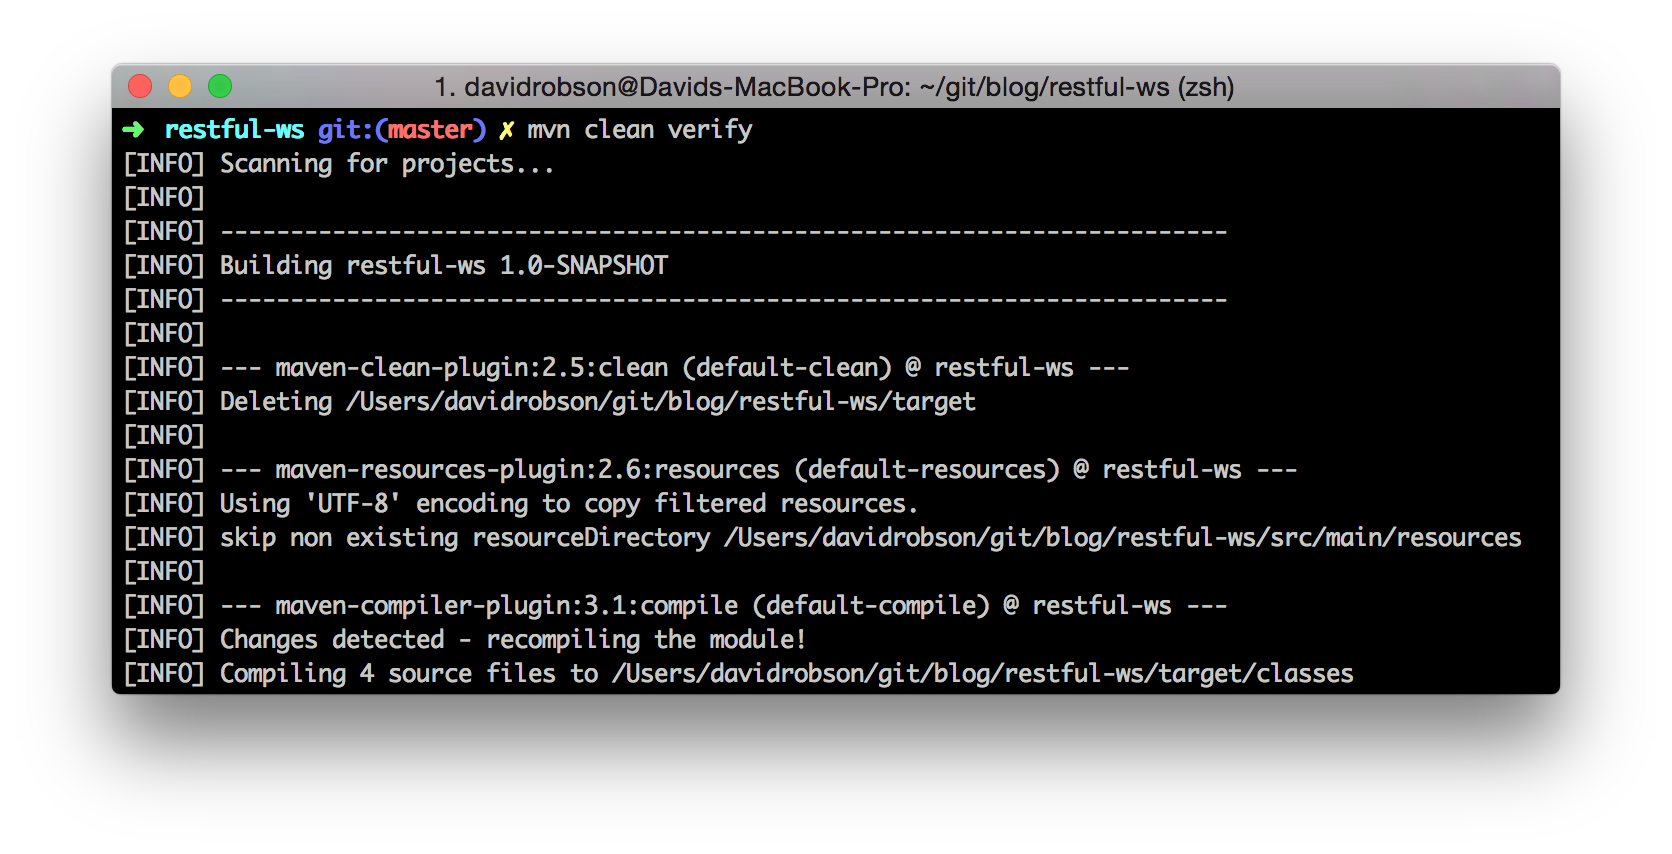
You'll see maven go off and find the projects' dependencies, compiling the code and generating the WAR, placing it in the target folder.
Deploy
With the WAR created it can be deployed to any application server that supports Servlet 2.5 or above, e.g. Jboss/WildFly, Tomcat, GlassFish, Jetty, ...
For simplicity, adding a Jetty server via a maven plugin is nice option.
Add the plugin to the bottom of the pom.xml.
<project>
.........
    <build>
        <plugins>
            <plugin>
                <groupId>org.eclipse.jetty</groupId>
                <artifactId>jetty-maven-plugin</artifactId>
                <version>${jettyVersion}</version>
            </plugin>
        </plugins>
    </build>
</project>
Finally its ready to deploy and run. Using the same build command as before, maven will download the new jetty plugin. jetty:run is then used to run the jetty server and automatically deploy the app.
mvn clean verify && mvn jetty:run
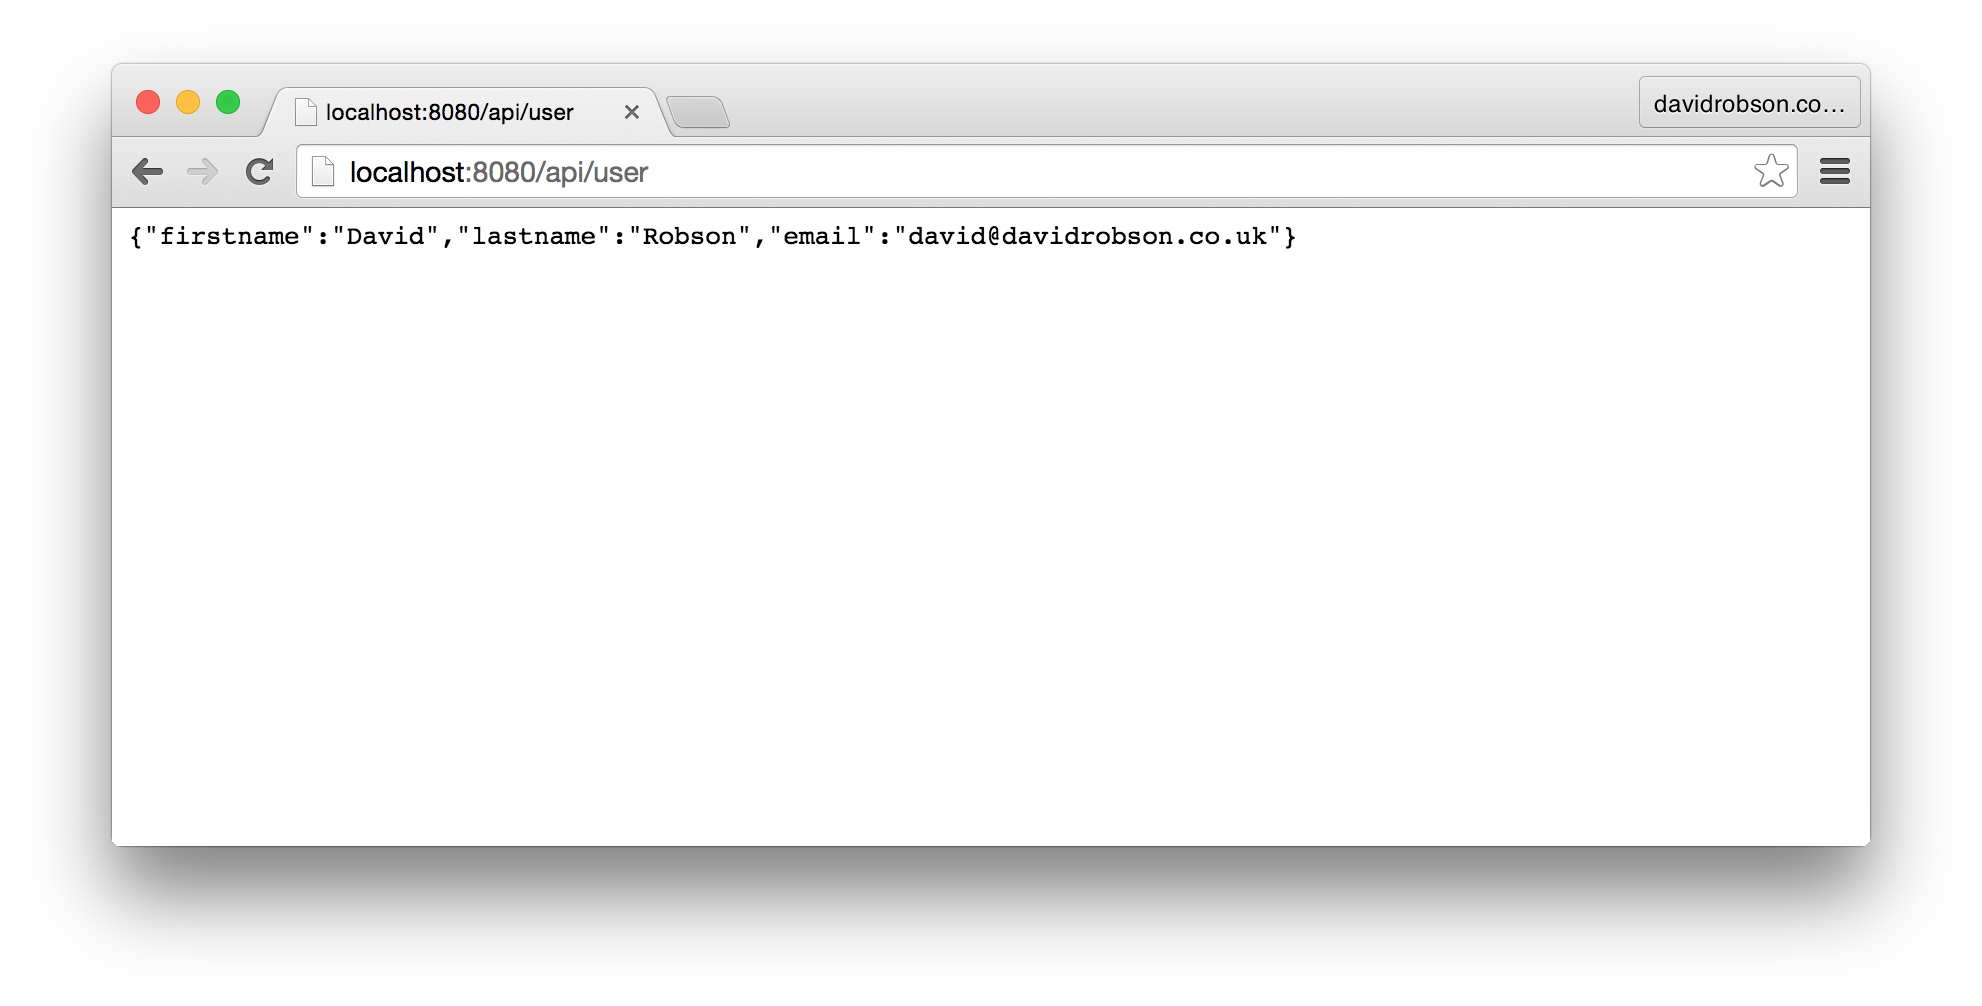
The app will be running on port 8080 and if you send a get request to /api/user it'll respond with the user object in json. You can also just check it out in your browser Get User. To stop the server use ctrl+c on the terminal.
Conclusion
This is a very basic start to a Java backend but serves as a great foundation to build on. Next steps would be to start expanding the api adding in a service layer and connect in a database.
Thank you for taking the time to read this article and I hope you've found it useful. If you have any questions either Tweet Me @DavidERobson or leave a comment and i'll try and get back to you!
All the code is hosted on Github https://github.com/DaveRobson/post-restful-ws